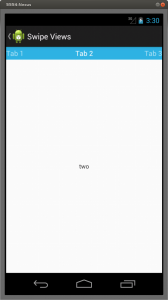
In a previous post I implemented a layout with 2 tabs using an action bar and fragments; the disadvantage of this layout is that dragging horizzontally the views in a similar way to Google Play would be very natural for the user.
In Horizontal View Swiping with ViewPager you can see how to get this layout using ViewPager, which is part of the Compatibility Package.
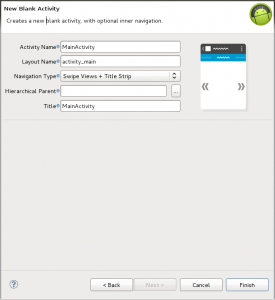
I noticed that you get a similar code similar when you create a new Android project using Android SDK Tools Revision 20, and choosing as the Navigation Type in the project creation wizard “Swipe Views + Title Strip” as shown.

The code in this post is the same as that in Horizontal View Swiping with ViewPager but with the change that the layout of the fragments are taken from file .xml
- create an Android project
- Build SDK: API 16
- Minimum required SDK: API 14
- don’t create activities
- import the Compatibility Package; maybe you already imported it if there is a directory “libs” with the file android-support-v4.jar, otherwise you do a right click on the project and select Android Tools -> Add Support Library or follow the instructions in Support Library
- edit the file AndroidManifest.xml
<manifest xmlns:android="http://schemas.android.com/apk/res/android" package="eu.lucazanini.swipeviews" android:versionCode="1" android:versionName="1.0"> <uses-sdk android:minSdkVersion="14" android:targetSdkVersion="16" /> <application android:icon="@drawable/ic_launcher" android:label="@string/app_name" android:theme="@style/AppTheme" > <activity android:name=".MainActivity" android:label="@string/app_name" > <intent-filter> <action android:name="android.intent.action.MAIN" /> <category android:name="android.intent.category.LAUNCHER" /> </intent-filter> </activity> </application> </manifest> - edit the file res/values/strings.xml
<resources> <string name="app_name">Swipe Views</string> <string name="body1">one</string> <string name="body2">two</string> <string name="body3">three</string> <string name="label1">Tab 1</string> <string name="label2">Tab 2</string> <string name="label3">Tab 3</string> </resources> - create the files main.xml, tab1.xml, tab2.xml e tab3.xml in the directory res/layout
- main.xml
<!-- Copyright 2012 The Android Open Source Project Licensed under the Apache License, Version 2.0 (the "License"); you may not use this file except in compliance with the License. You may obtain a copy of the License at http://www.apache.org/licenses/LICENSE-2.0 Unless required by applicable law or agreed to in writing, software distributed under the License is distributed on an "AS IS" BASIS, WITHOUT WARRANTIES OR CONDITIONS OF ANY KIND, either express or implied. See the License for the specific language governing permissions and limitations under the License. --> <android.support.v4.view.ViewPager xmlns:android="http://schemas.android.com/apk/res/android" android:id="@+id/pager" android:layout_width="match_parent" android:layout_height="match_parent"> <!-- This title strip will display the currently visible page title, as well as the page titles for adjacent pages. --> <android.support.v4.view.PagerTitleStrip android:id="@+id/pager_title_strip" android:layout_width="match_parent" android:layout_height="wrap_content" android:layout_gravity="top" android:background="#33b5e5" android:textColor="#fff" android:paddingTop="4dp" android:paddingBottom="4dp" /> </android.support.v4.view.ViewPager> - tab1.xml
<?xml version="1.0" encoding="utf-8"?> <LinearLayout xmlns:android="http://schemas.android.com/apk/res/android" android:id="@+id/tab1" android:layout_width="match_parent" android:layout_height="match_parent" android:orientation="vertical" android:gravity="center"> <TextView android:id="@+id/textView1" android:layout_width="wrap_content" android:layout_height="wrap_content" android:layout_gravity="center" android:text="@string/body1" /> </LinearLayout> - tab2.xml
<?xml version="1.0" encoding="utf-8"?> <LinearLayout xmlns:android="http://schemas.android.com/apk/res/android" android:id="@+id/tab2" android:layout_width="match_parent" android:layout_height="match_parent" android:orientation="vertical" android:gravity="center"> <TextView android:id="@+id/textView2" android:layout_width="wrap_content" android:layout_height="wrap_content" android:layout_gravity="center" android:text="@string/body2" /> </LinearLayout> - tab3.xml
<?xml version="1.0" encoding="utf-8"?>
<LinearLayout xmlns:android="http://schemas.android.com/apk/res/android"
    android:id="@+id/tab3"
    android:layout_width="match_parent"
    android:layout_height="match_parent"
    android:orientation="vertical"
    android:gravity="center">

    <TextView
        android:id="@+id/textView3"
        android:layout_width="wrap_content"
        android:layout_height="wrap_content"
        android:layout_gravity="center"
        android:text="@string/body3" />

</LinearLayout>
the file main.xml consists of 2 parts: in the first part (android.support.v4.view.ViewPager) you define the ViewPager that contains the fragments of the tabs, in the second part (android.support.v4.view.PagerTitleStrip) you define the bar of the tabs setting its positions, colors and padding;
the files tab*.xml contain the layout of the fragments - main.xml
- create the file eu.lucazanini.viewpager.MainActivity.java
/**
 * Copyright 2012 The Android Open Source Project
 *
 * Licensed under the Apache License, Version 2.0 (the "License");
 * you may not use this file except in compliance with the License.
 * You may obtain a copy of the License at
 *
 *     http://www.apache.org/licenses/LICENSE-2.0
 *
 * Unless required by applicable law or agreed to in writing, software
 * distributed under the License is distributed on an "AS IS" BASIS,
 * WITHOUT WARRANTIES OR CONDITIONS OF ANY KIND, either express or implied.
 * See the License for the specific language governing permissions and
 * limitations under the License.
 */

package eu.lucazanini.swipeviews;

import android.app.ActionBar;
import android.os.Bundle;
import android.support.v4.app.Fragment;
import android.support.v4.app.FragmentActivity;
import android.support.v4.app.FragmentManager;
import android.support.v4.app.FragmentStatePagerAdapter;
import android.support.v4.view.ViewPager;
import android.view.LayoutInflater;
import android.view.View;
import android.view.ViewGroup;

public class MainActivity extends FragmentActivity {

    /**
     * The {@link android.support.v4.view.PagerAdapter} that will provide
     * fragments representing each object in a collection. We use a
     * {@link android.support.v4.app.FragmentStatePagerAdapter} derivative,
     * which will destroy and re-create fragments as needed, saving and
     * restoring their state in the process. This is important to conserve
     * memory and is a best practice when allowing navigation between objects in
     * a potentially large collection.
     */
    CollectionPagerAdapter mCollectionPagerAdapter;

    /**
     * The {@link android.support.v4.view.ViewPager} that will display the
     * object collection.
     */
    ViewPager mViewPager;

    public void onCreate(Bundle savedInstanceState) {
	super.onCreate(savedInstanceState);
	setContentView(R.layout.main);

	// Create an adapter that when requested, will return a fragment
	// representing an object in
	// the collection.
	//
	// ViewPager and its adapters use support library fragments, so we must
	// use
	// getSupportFragmentManager.
	mCollectionPagerAdapter = new CollectionPagerAdapter(
		getSupportFragmentManager());

	// Set up action bar.
	final ActionBar actionBar = getActionBar();

	// Specify that the Home button should show an "Up" caret, indicating
	// that touching the
	// button will take the user one step up in the application's hierarchy.
	actionBar.setDisplayHomeAsUpEnabled(true);

	// Set up the ViewPager, attaching the adapter.
	mViewPager = (ViewPager) findViewById(R.id.pager);
	mViewPager.setAdapter(mCollectionPagerAdapter);
    }

    /**
     * A {@link android.support.v4.app.FragmentStatePagerAdapter} that returns a
     * fragment representing an object in the collection.
     */
    public class CollectionPagerAdapter extends FragmentStatePagerAdapter {

	final int NUM_ITEMS = 3; // number of tabs

	public CollectionPagerAdapter(FragmentManager fm) {
	    super(fm);
	}

	@Override
	public Fragment getItem(int i) {
	    Fragment fragment = new TabFragment();
	    Bundle args = new Bundle();
	    args.putInt(TabFragment.ARG_OBJECT, i);
	    fragment.setArguments(args);
	    return fragment;
	}

	@Override
	public int getCount() {
	    return NUM_ITEMS;
	}

	@Override
	public CharSequence getPageTitle(int position) {

	    String tabLabel = null;
	    switch (position) {
	    case 0:
		tabLabel = getString(R.string.label1);
		break;
	    case 1:
		tabLabel = getString(R.string.label2);
		break;
	    case 2:
		tabLabel = getString(R.string.label3);
		break;
	    }

	    return tabLabel;
	}
    }

    /**
     * A dummy fragment representing a section of the app, but that simply
     * displays dummy text.
     */
    public static class TabFragment extends Fragment {

	public static final String ARG_OBJECT = "object";

	@Override
	public View onCreateView(LayoutInflater inflater, ViewGroup container,
		Bundle savedInstanceState) {

	    Bundle args = getArguments();
	    int position = args.getInt(ARG_OBJECT);

	    int tabLayout = 0;
	    switch (position) {
	    case 0:
		tabLayout = R.layout.tab1;
		break;
	    case 1:
		tabLayout = R.layout.tab2;
		break;
	    case 2:
		tabLayout = R.layout.tab3;
		break;
	    }

	    View rootView = inflater.inflate(tabLayout, container, false);

	    return rootView;
	}
    }
}
the main class extends FragmentActivity and not Activity as usually;
in the event onCreate you bind an instance of FragmentStatePagerAdapter (mCollectionPagerAdapter) to an instance of ViewPager (mViewPager) defined in the file main.xml;
in the inner class CollectionPagerAdapter you define the number of the tabs (NUM_ITEMS) and override 3 methods: getItem in which you create the fragments, getCount that simply returns the number of the fragments (tabs) and getPageTitle that returns the labels of the tabs; in an other inner class TabFragment you create the fragments choosing the layout depending on the bundle passed to the fragment in the CollectionPagerAdapter;
the class CollectionPagerAdapter is not static like in Horizontal View Swiping with ViewPager in order to get the string resources in the method getPageTitle, otherwise you need a static Context in the main class - launch the app


Leave a Reply