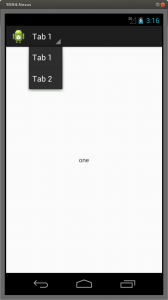
The spinner menu is a navigation mode that allows you to switch from one view to another using a drop down menu.
The advantage of using the spinner menu consists in a more compact design because it does not require a dedicated tab bar, but it uses the bar already commonly used for the title and the logo of the application.
According to the Google guidelines for action bar the spinner menu should be used to show different views that show the same data but arranged and filtered in a different way (calendar by day, week or month) or that show the same data type (for example, the contents of multiple accounts).
The following is an example implementation of a spinner menu to show 2 fragments.
- create an Android project without a starting Activity
- edit the file AndroidManifest.xml
<manifest xmlns:android="http://schemas.android.com/apk/res/android" package="eu.lucazanini.spinnermenu" android:versionCode="1" android:versionName="1.0"> <uses-sdk android:minSdkVersion="14" android:targetSdkVersion="15" /> <application android:label="@string/app_name" android:icon="@drawable/ic_launcher" android:theme="@style/AppTheme"> <activity android:name="MainActivity"> <intent-filter> <action android:name="android.intent.action.MAIN"/> <category android:name="android.intent.category.LAUNCHER"/> </intent-filter> </activity> </application> </manifest> - edit the file res/values/strings.xml
<resources>
	<string name="app_name">Spinner Menu</string>
	<string name="body1">one</string>
	<string name="body2">two</string>
	<string-array name="labelMenu">
		<item >Tab 1</item>
		<item >Tab 2</item>
	</string-array>
</resources>
- create the 2 resources for the layouts res/layout/tab1.xml and res/layout/tab2.xml
<?xml version="1.0" encoding="utf-8"?>
<LinearLayout xmlns:android="http://schemas.android.com/apk/res/android"
    android:id="@+id/tab1"
    android:layout_width="match_parent"
    android:layout_height="match_parent"
    android:orientation="vertical"
    android:gravity="center">

    <TextView
        android:id="@+id/textView1"
        android:layout_width="wrap_content"
        android:layout_height="wrap_content"
        android:layout_gravity="center"
        android:text="@string/body1" />

</LinearLayout>
<?xml version="1.0" encoding="utf-8"?> <LinearLayout xmlns:android="http://schemas.android.com/apk/res/android" android:id="@+id/tab2" android:layout_width="match_parent" android:layout_height="match_parent" android:orientation="vertical" android:gravity="center"> <TextView android:id="@+id/textView2" android:layout_width="wrap_content" android:layout_height="wrap_content" android:layout_gravity="center" android:text="@string/body2" /> </LinearLayout> - create the class eu/lucazanini/spinnermenu/MainActivity.java
package eu.lucazanini.spinnermenu;

import android.app.ActionBar;
import android.app.Activity;
import android.app.FragmentTransaction;
import android.os.Bundle;
import android.widget.ArrayAdapter;

public class MainActivity extends Activity {

    @Override
    protected void onCreate(Bundle savedInstanceState) {
	super.onCreate(savedInstanceState);

	final ActionBar actionBar = getActionBar();

	// Specify that a dropdown list should be displayed in the action bar.
	actionBar.setNavigationMode(ActionBar.NAVIGATION_MODE_LIST);

	// Hide the title
	actionBar.setDisplayShowTitleEnabled(false);
	actionBar.setDisplayUseLogoEnabled(false);

	// Specify a SpinnerAdapter to populate the dropdown list.
	ArrayAdapter<String> spinnerMenu = new ArrayAdapter<String>(
		actionBar.getThemedContext(),
		android.R.layout.simple_list_item_1, getResources()
			.getStringArray(R.array.labelMenu));

	actionBar.setListNavigationCallbacks(

	spinnerMenu,

	// Provide a listener to be called when an item is selected.
		new ActionBar.OnNavigationListener() {
		    public boolean onNavigationItemSelected(int position,
			    long id) {
			// Take action here, e.g. switching to the
			// corresponding fragment.
			FragmentTransaction tx = getFragmentManager()
				.beginTransaction();

			switch (position) {
			case 0:
			    tx.replace(android.R.id.content, new Tab1Fragment());
			    break;
			case 1:
			    tx.replace(android.R.id.content, new Tab2Fragment());
			    break;
			default:
			    break;
			}

			tx.commit();

			return true;
		    }
		});
    }
}
in this class you can see:
- you enable the NAVIGATION_MODE_LIST for the action bar
- you hide the title to get more space for the menu
- you create an object of the class ArrayAdapter that implements the interface SpinnerAdapter using an array of strings defined in a resource file
- create the classses eu/lucazanini/spinnermenu/Tab1Fragment.java and eu/lucazanini/spinnermenu/Tab2Fragment.java
package eu.lucazanini.spinnermenu;

import android.app.Fragment;
import android.os.Bundle;
import android.view.LayoutInflater;
import android.view.View;
import android.view.ViewGroup;
import android.widget.LinearLayout;

public class Tab1Fragment extends Fragment {

    @Override
    public View onCreateView(LayoutInflater inflater, ViewGroup container,
	    Bundle savedInstanceState) {
	return (LinearLayout) inflater.inflate(R.layout.tab1, container, false);
    }

}
package eu.lucazanini.spinnermenu; import android.app.Fragment; import android.os.Bundle; import android.view.LayoutInflater; import android.view.View; import android.view.ViewGroup; import android.widget.LinearLayout; public class Tab2Fragment extends Fragment { @Override public View onCreateView(LayoutInflater inflater, ViewGroup container, Bundle savedInstanceState) { return (LinearLayout) inflater.inflate(R.layout.tab2, container, false); } } - launch the app

References:
Spinners
Action Bar
Implementing Lateral Navigation

Leave a Reply