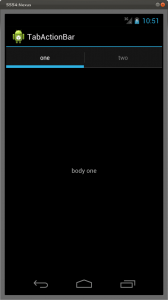
In the post Tab Layout in Android with ActionBar and Fragment I wrote an example of using an ActionBar whose labels are shown in uppercase even if you use the statement:
actionBar.newTab (). setText (“my string”);
where “my string” is lowercase.
In this article I show how to customize the labels in lowercase but it is evident that you can customize many other aspects.
I assume you have already created the project in Tab Layout in Android with ActionBar and Fragment as starting point.
- create the files res/layout/tablabel1.xml and res/layout/tablabel2.xml
<?xml version="1.0" encoding="utf-8"?>
<RelativeLayout xmlns:android="http://schemas.android.com/apk/res/android"
    android:layout_width="0dip"
    android:layout_height="64dip"
    android:layout_marginLeft="-3dip"
    android:layout_marginRight="-3dip"
    android:layout_weight="1"
    android:orientation="vertical" >

    <TextView
        android:id="@+id/title"
        style="?android:attr/tabWidgetStyle"
        android:layout_width="wrap_content"
        android:layout_height="match_parent"
        android:layout_centerHorizontal="true"
        android:text="@string/label1" />

</RelativeLayout>
<?xml version="1.0" encoding="utf-8"?> <RelativeLayout xmlns:android="http://schemas.android.com/apk/res/android" android:layout_width="0dip" android:layout_height="64dip" android:layout_marginLeft="-3dip" android:layout_marginRight="-3dip" android:layout_weight="1" android:orientation="vertical" > <TextView android:id="@+id/title" style="?android:attr/tabWidgetStyle" android:layout_width="wrap_content" android:layout_height="match_parent" android:layout_centerHorizontal="true" android:text="@string/label2" /> </RelativeLayout>these files are derived from the file tab_inidcator.xml of the source code of Android
- modify the method onCreate of the class eu.lucazanini.TabActionBarActivity with the following:
    public void onCreate(Bundle savedInstanceState) {
	super.onCreate(savedInstanceState);

	ActionBar actionBar = getActionBar();

	actionBar.setNavigationMode(ActionBar.NAVIGATION_MODE_TABS);

	String label1 = getResources().getString(R.string.label1);
	Tab tab = actionBar.newTab();
	RelativeLayout view = (RelativeLayout) getLayoutInflater().inflate(
		R.layout.tablabel1, null);
	tab.setCustomView(view);

	TabListener<Tab1Fragment> tl = new TabListener<Tab1Fragment>(this,
		label1, Tab1Fragment.class);
	tab.setTabListener(tl);
	actionBar.addTab(tab);

	String label2 = getResources().getString(R.string.label2);
	tab = actionBar.newTab();
	view = (RelativeLayout) getLayoutInflater().inflate(R.layout.tablabel2,
		null);
	tab.setCustomView(view);

	TabListener<Tab2Fragment> tl2 = new TabListener<Tab2Fragment>(this,
		label2, Tab2Fragment.class);
	tab.setTabListener(tl2);
	actionBar.addTab(tab);

    }
this method need the import android.widget.RelativeLayout
- launch the application:


Leave a Reply